First of all, to Create React Native App in visual studio code you need some setup. Therefore we will discuss step by step how you will set up your system for React Native App Development.
React.js is a component-based library developed and maintained by the Facebook. This library helps you to develop the best UI for the Native App. It is a component-based architecture, therefore, it will very easy to you for developing Complex UI for your Native Application
Table of Content
- Install Node.js
- Necessary Extensions for React and React Native
- Install React Native App
- Create React Native Project
- Install React Native CLI
- Start React Native App
- Advantage of React Native
- Disadvantage of React Native
Step 1: Install Node.JS and React
Best way to install react and react native with the use of Node Package Manager (npm), So to take advantage of npm its recommended first install node.js. Try to use npm command for install and manage node modules because manual installation may be complex for you.
Read More How you will install node.js and react.js
Step 2: Install necessary extensions to Create and Development React Native App
Basically some extensions do not require for react native app but for faster development you need to install it. It helps you to write code very easy way. That’s why we will discuss those extensions with details.
List of Necessary Extensions for React Native App
Before start development you should install visual studio code extensions from Visual Studio Marketplace. To install extensions in the Visual Studio Code just follow the following step.
Step-1: Click on Extension icon in visual studio code
Step-2: Search the extension
Step-3: Click on Install button

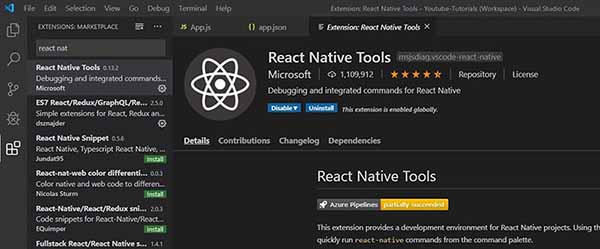
List of essential extensions for React Native App
React Native Tools
At the very first before start React Native App install React Native Tools to set up a development environment for react native project. It can help you to run React Native command quickly from Visual Studio Code terminal and also you can able to debug your code.
Babel JavaScript
Babel JavaScript is responsible for convert ECMAScript 2015+ code into a backward-compatible version of JavaScript. Therefore you need to install this extension. Its free and open source.
Flow Language Support
This extension helps you to write code as it check javascript type therefore its find the type error in the javascript program.
ESLint
This is not a mandatory extension for React Native App because it check project documentation. So If you are new in react native app then you can use it.
Prettier – Code formatter
This extension helps to format the section of your cod as a result it will make it easy to manage your code. It’s very important to keep your code formatted section wise so the extension requires. It helps you and your team to maintain your react projects.
Auto Close Tag/Auto Complete Tag/Auto Rename Tag
Those extensions are reduce your typing effort and help for fast coding.
AutoClose Tag – At the time of coding when you opening a tag that time the closing tag automatically generates. So it reduces the tag mismatch error.
AutoComplete Tag – This is a combine function of auto-closing and auto rename tag
Auto Rename Tag– Basically this extension also helps to write code. Therefore If you rename the opening tag then no need to change the closing tag. Because the auto rename extension automatically changes your closing tag. As a result it helps to manage and update your big project. Sometimes finding a closing tag very difficult from a big source code, in this case this tag also helps you.
And also install the following tag to setup react native app in visual studio code editor.
Color Highlight – Its highlight CSS color and also web color, If you feel its help you then you can install it.
Git Blame – This extension provides information in the status bar about the selected line.
Path Intellisense – This is one more extension. It will help to choose the path as well as tag also smartly.
SVG Viewer – Basically it is an SVG viewer. If you need an SVG file in your project then you definitely install it.
TO DO Highlight
change-case
Code Spell Checker
npm Intellisense
Search node_modules
Settings Sync
markdownlint
Bracket Pair Colorizer
ES7 React/Redux/GraphQL/React-Native snippets
Step-3: Install React Native App
For Installation of React Native App, open Node.js Command prompt then type the command below and press enter. After taking some time installation will be done and your system ready to create a react native app.
npm install -g create-react-native-app
Note: This command may generate an error at the time of installation. Just you need to open the command prompt as administrator, then the installation will don without any problem.
Step-4: Create React Native Project
Finally now time to create a react native project. As you have successfully set up your system to react native app therefore your system ready to create the project.
After complete the above all configuration create React Native App, please execute the command below. It automatically create your app.
create-react-native-app developers-zone
As a result of this command the “developers-zone” folder will generate and in this folder create react native application. Hare ” developers-zone ” is my application name you can use your name.
You may get the following error while you execute the app creation command in the visual studio code terminal.
system. For more information, see about_Execution_Policies at https:/go.microsoft.com/fwlink/?LinkID=135170.
At line:1 char:1
+ create-react-native-app developers-zone
+ ~~~~~~~~~~~~~~~~~~~~~~~
+ CategoryInfo : SecurityError: (:) [], PSSecurityException
+ FullyQualifiedErrorId : UnauthorizedAccess
This is a security-related issue. If you get this type of error then you can run it from the command prompt (cmd). also run the command prompt as administrator mode.
This command will perform all processes for creating your native app. You will get a template selection screen like below.

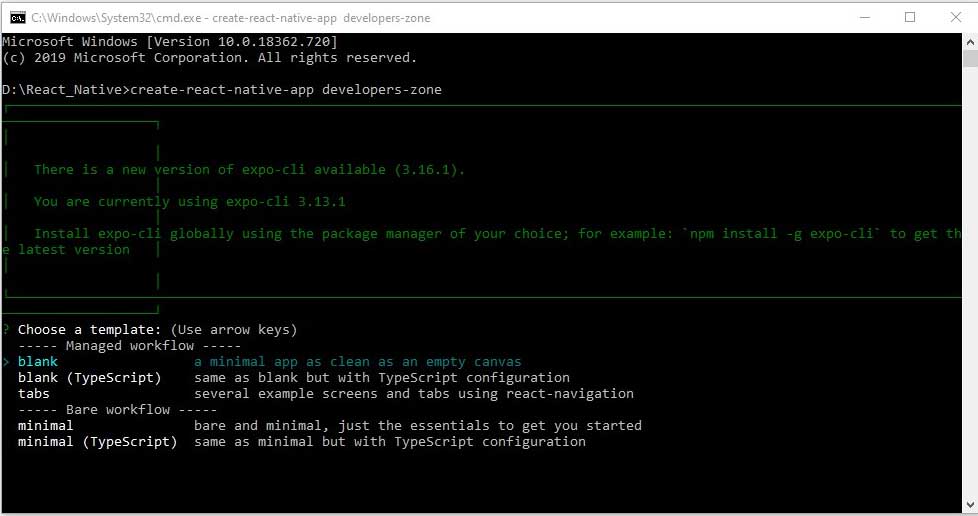
Hare, you can choose any option as per your requirement. If you want to know more details about those templates then you can try every template one by one.
I recommend you first time go with a blank template and set up every configuration manually. Because you need to learn every detail about react native app. It will definitely help you.
After complete the app creation process you need to enter the app directory and run your app.


Convert website into a mobile app
Click on above link to know how you will create a mobile app from your existing website.
Step 4: Install React Native CLI
There are two npm packages for react native app 1st is React Native CLI and 2nd one is React Native. React Native CLI is a lightweight package therefore it should be installed globally and React Native installed locally.
To install React Native CLI in your system run the command below. It will install and also configure your system automatically.
npm install -g react-native-cli
Step 5: Start react native
The last and final step is to run for the react-native application. In this tutorial we will just run a “Hello World” program just for testing total installation.
For example we modify the “App.js” file and build a simple app. The “App.js” file looks like below.
“App.js” File
Output
Hello World
Before running React Native App 1st enter your project directory and then start the app. Please enter the following command to run the application.
cd developers-zone
npm start
You will get following screen after installation done

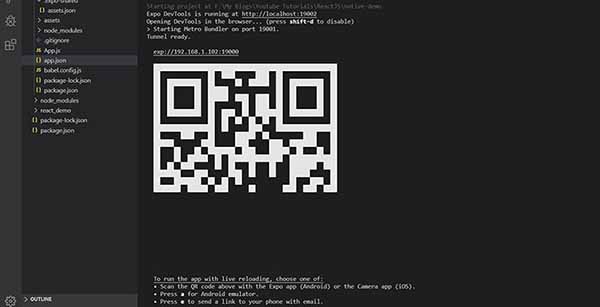
Hare “native-demo” is my project directory therefore we use it. In the case of your project you should use your project directory. When successfully started your native application you will get a QR Code like below. Now to see the output of the application you nee the Expo app on your mobile for this reason please install the Expo app on your mobile.
Also you will get a ui that is expo development tools like below.

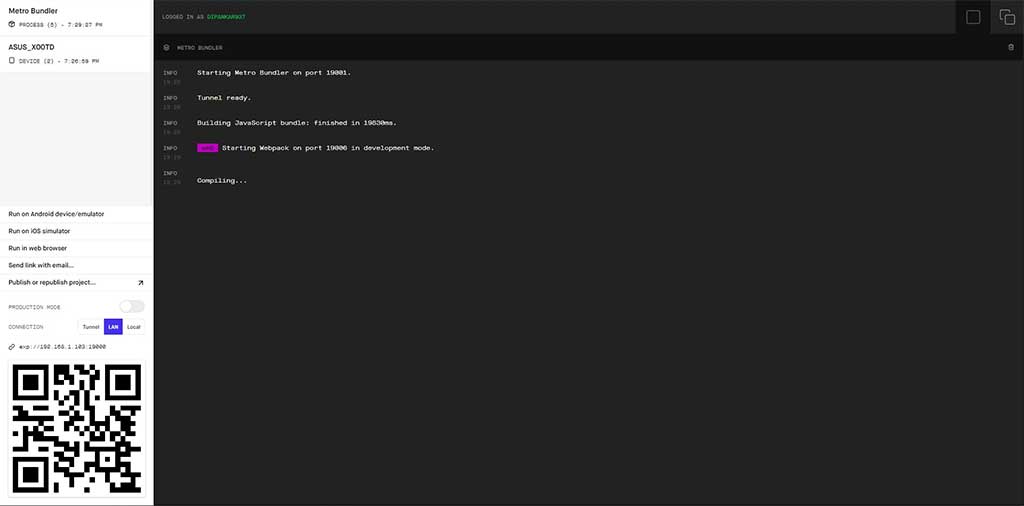
Finally after installing the app open it and scan the QR Code to see the preview of your app. One more important thing your mobile should connect with the same network because the directly connected to your system.

Advantage of React Native
As it is JavaScript-based so it is faster. The app created by React Native, will give you the best performance.
React is cross-platform therefore you not need to develop different app for iOS and Android separately. So the development and maintenance cost less than others.
As is it component-based development technique so you can take advantage of the reuse of the pre-development component.
The very large community of developers is really helpful to resolve any issues because there is so much content about to react.
Hot reloading feature of react helps you to get instance preview and also reduce your development time. Because no need to run the project on every modification.
Support 3rd part plugins – you can simply use plugins and also support modular architecture. It keeps your project simple.
Disadvantage of React Native
It only handles client site activity. For server site functions you need a separate programming language. It is best for application but not on the website. Because there is no good cms system even in 2020. But later we can expect the best CMS system in react.
As Google and other search did not crawl dynamic contain so some indexing problems maybe occur hare. But I can expect later it will resolve.