Best and easy way to Build React Native APP for both Android and iOS. We need an installation file to publish our mobile application. Therefore you require an installation file for mobile.
In this tutorial we discuss about build process of react native app. And also discuss some common problem occur at the time of build installation file.
Table of Content
- Install Expo CLI
- Configuration of App.json file for React native app build
- Change icon and splash images for app
- Build process of the React native app
- How to solve the Errors
First of all, you need to create a native application before building it for android and ios. I hope you have created your app and ready to publish. If you want to know how to create an app in react native then please go through the following link.


Create your react native app for Android & iOS
Click on above link to know simplest way to create react native app.


Convert your website into a mobile app
Click on above link to know how convert your website into a mobile app.
React native build app .apk for android or .ipa file for ios
Now we discuss the essential steps that need for building .apk (Android) and .ipa (iOS) file.
Step 1: Install Expo CLI
We use the expo CLI tool for developing and building the app. Therefore we need to install Expo CLI. For installation Expo CLI run following command in terminal.
npm install -g expo-cli
OR
yarn global add expo-cli
If you use expo first time then you need to create an expo account and login with the expo account. You will get automatically this account creation form when need. Just fill up with a valid email id.
If you are a windows user then you must enable WSL. You can read installation guideline of WSL
Step 2: Configuration of App.json file for React native app build
In this step you need to create two configuration settings. One is for android and another is for iOS. Update the App.json file with as following.
{
  "expo": {
    "name": "APP Name",
    "slug": "app-name",
    "privacy": "public",
    "sdkVersion": "36.0.0",
    "platforms": [
      "ios",
      "android",
      "web"
    ],
    "version": "1.0.0",
    "orientation": "portrait",
    "icon": "./assets/icon.png",
    "splash": {
      "image": "./assets/splash.png",
      "resizeMode": "contain",
      "backgroundColor": "#ffffff"
    },
    "updates": {
      "fallbackToCacheTimeout": 0
    },
    "assetBundlePatterns": [
      "**/*"
    ],
    "ios": {
      "bundleIdentifier": "com.companyname.appname",
      "buildNumber": "1.0.0"
    },
    "android": {
      "package": "com.companyname.appname",
      "versionCode": 1
    }
  }
}
Hare you just need to change your app name and slug and add two additional sections.
For Android
"android": {
      "package": "com.companyname.appname",
      "versionCode": 1
    }
For iOS
 "ios": {
      "bundleIdentifier": "com.companyname.appname",
      "buildNumber": "1.0.0"
    }
Do not forget to change your unique identifier. For android change the value of “package” and for iOS change the value of “bundleIdentifier”. It’s necessary before start building app.
Step 3: Change icon and splash images before start building React native app
Change app icon which is available under the assets directory. Also change splash image before start the build process. Keep the splash and icon exactly the same aspect ratio and height width. Best way to open those files with Photoshop or other image editor software and change it with your images.
Step 4: Start the build process of the React native app.
Run build command for creating .apk file for android and .ipa file for ios. Run the following command.
For android
expo build:android
For ios
expo build:ios
If you want to build for Android
In the case of android build you can choose two types of build processes. One is for build “APK” and another is Android App Bundle. Below describe commands for both.
For build “APK”
expo build:android -t apk
For app bundle
expo build:android -t app-bundle
App bundle is always recommended but one important checking you need to do that is Google Play App Signing enabled in your project. Run the expo command in command prompt.
Build Errors and solutions
ERROR! “expo” is not recognized
You may get this error while run expo command for build purpose.
‘expo’ is not recognized as an internal or external command, operable program or batch file.
If you get this type of error then check the “%USERPROFILE%\AppData\Roaming\npm” location. just copy the location and open folder and find the “EXE” file. the “EXE” file name may be “exp” instead of “expo” and also check the environment variable path. If the path does not exist then you should set the path.
Is case of the “EXE” file name is “exp” the please go with following command.
For Android apk file
exp build:android
For ios .ipa file
exp build:ios
Error: Problem validating fields in app.json
[21:13:07] Error: Problem validating fields in app.json. See https://docs.expo.io/versions/v36.0.0/guides/configuration.html
[21:13:07] • Field: ios.bundleIdentifier – ‘ios.bundleIdentifier’ should be a iOS bundle identifier notation unique name for your app. For example, host.exp.expo, where exp.host is our domain and expo is our app name..
[21:13:09] Error: Problem validating fields in app.json. See https://docs.expo.io/versions/v36.0.0/guides/configuration.html
[21:13:09] • Field: ios.bundleIdentifier – ‘ios.bundleIdentifier’ should be a iOS bundle identifier notation unique name for your app. For example, host.exp.expo, where exp.host is our domain and expo is our app name..
This type of error we get due to invalid app identifier settings. Just check the following section in your app.json file.
    "ios": {
      "bundleIdentifier": "com.companyname.myappname",
      "buildNumber": "1.0.0"
    },
    "android": {
      "package": "com.companyname.myappname",
      "versionCode": 1
    }
You need to set “bundleIdentifier” for ios and “package” for android.
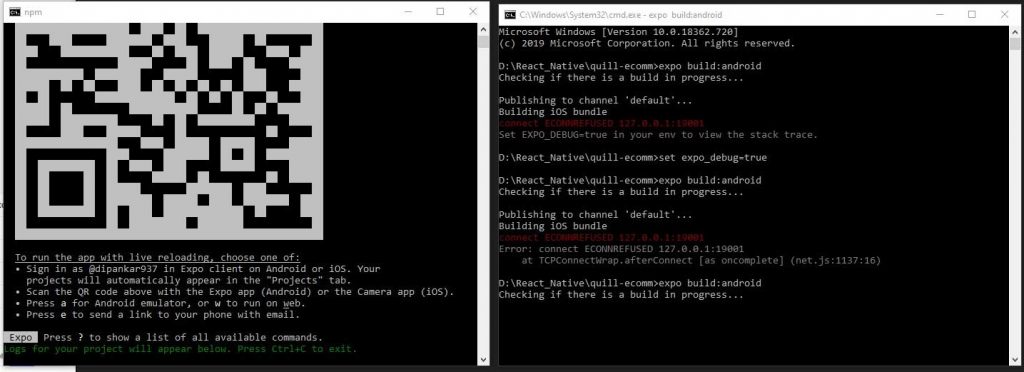
ERROR! connect ECONNREFUSED 127.0.0.1:19001
connect ECONNREFUSED 127.0.0.1:19001
Error: connect ECONNREFUSED 127.0.0.1:19001
at TCPConnectWrap.afterConnect as oncomplete
This error occurs due to the React Native app not running. To avoid this type of error you need to start the app first and at the same time open another window to run build command like the below image.

ERROR! write ECONNRESET
write ECONNRESET
Error: write ECONNRESET
at WriteWrap.onWriteComplete as oncomplete
This type of error may generate for following issues.
- For networking issue – please check you internet connection
- Check your firewall – If possible disable your firewall for some time.
- Your antivirus may block it – If possible disable antivirus for some time.
After that run the build command again. Now I hope you will successfully complete your build process.
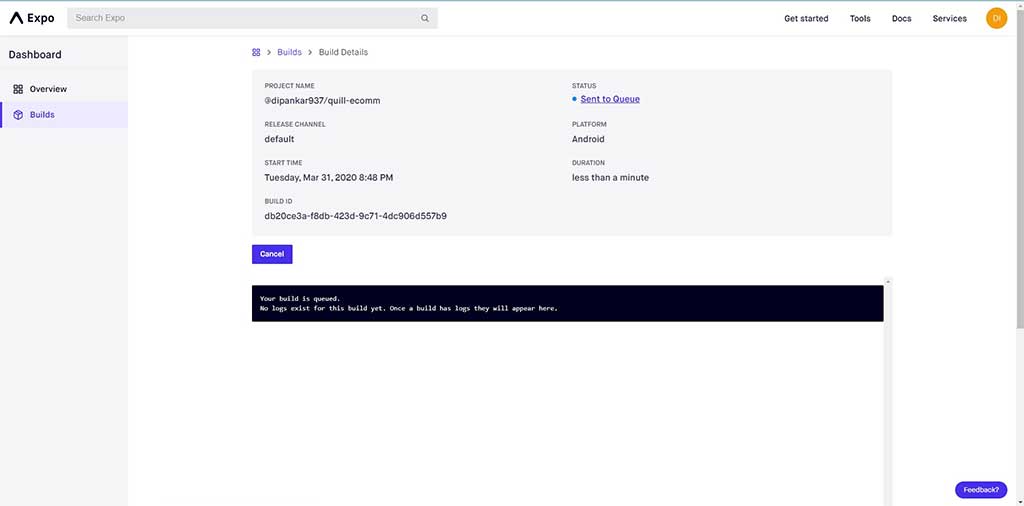
When the build process is in progress then you will get an URL. using this URL you can get build status from time to time like below.